
Table of Contents
- Understanding Sliding Door Wheels: Types and Components
- How to Adjust Sliding Glass Door Rollers
- Sliding Door Roller Replacement: Step-by-Step Installation
- Sliding Door Maintenance Tips and Lubrication Schedule
- Best Sliding Door Wheel Lubricants and Products
- Troubleshooting Common Sliding Door Wheel Problems
- Adjustment vs Replacement: When to Do Each
- Conclusion
Sliding Door Wheels: The Complete Replacement & Adjustment Guide
Last Updated: July 3, 2026
Need replacement parts? Browse our full range of sliding door rollers to identify and buy the exact wheel for your door, or send us a photo and we will match it for you.
When your sliding glass door sticks or jams, the culprit is almost always the sliding door wheels. These small but critical components bear the full weight of your door and endure constant friction against the track. Many "broken" doors can be fixed with simple adjustment, no replacement needed. But knowing which type of roller you need prevents costly mistakes.
Understanding Sliding Door Wheels: Types and Components
Sliding door wheels come in several distinct configurations. The roller assembly sits inside a carriage that runs along the bottom track. Single roller assemblies feature one wheel per side, commonly found on lighter residential doors, while tandem roller systems use two wheels per carriage for heavier doors or high-traffic installations.
The housing width, the measurement across the carriage, is critical. A roller that’s too wide won’t fit in your track; one too narrow will rattle and wear unevenly. Measuring this width before ordering replacement sliding door wheels prevents frustration and return trips.
Identifying Roller Assembly Types
Most Australian sliding doors use either Prime-Line rollers or OEM (original equipment manufacturer) components specific to brands like Aluminium Sliders, Trend, or Homestead. The easiest way to identify your roller type is to examine the carriage itself; manufacturers often stamp their name into the housing.
If you can’t see a brand name, measure the housing width and note the wheel diameter. These two dimensions, combined with a photo of your current roller, are usually enough for expert identification. Some doors use sealed cartridge rollers that come as a complete unit, while others have individual wheels that can be replaced separately.
Wheel Profiles: Concave vs Convex
The shape of the wheel, concave (curved inward) or convex (curved outward), affects how the roller tracks along the door’s rail. Concave wheels grip the track more securely and are the modern standard because they provide better alignment and reduce wear on the track itself. If you’re upgrading an older door, switching to concave wheels often improves operation noticeably.
Material Comparison: Steel, Nylon, and Ball Bearing
Steel wheels are durable and affordable, making them the most common choice for residential doors. They withstand heavy use but require regular lubrication to prevent rust.
Nylon wheels offer quieter operation and resist corrosion naturally, making them ideal for coastal areas or humid environments. They’re slightly more expensive than steel but last considerably longer in challenging climates.
Ball bearing rollers represent the premium option, with sealed bearings that reduce friction dramatically. These sliding door wheels provide the smoothest operation and require minimal maintenance.
For Perth installations, nylon or ball bearing wheels outperform steel in the long term because they resist the salt air and dust common to Western Australia. The slightly higher upfront cost pays for itself through reduced maintenance and longer service life.
How to Adjust Sliding Glass Door Rollers
Before replacing your sliding door wheels, try adjusting the existing rollers. Many doors that seem broken simply need alignment correction. This process takes minutes and costs nothing.
The adjustment mechanism uses screws or bolts positioned on the carriage housing. These fasteners control the vertical height of the roller, which directly affects how the door sits in the track and how much friction it experiences. Raising or lowering the roller by just a few millimetres can transform a sticky door into one that glides smoothly.
Locating Adjustment Screws
Adjustment screws are typically found on the side of the carriage, either on the inside face (facing the track) or the outside face (facing the room). Look for Phillips or hex-head fasteners; these are your adjustment points. On many Prime-Line assemblies, you’ll find a screw labeled with up and down arrows, making the adjustment direction obvious.
Access to these screws requires the door to be partially or fully open. You may need to remove the door from the track to access screws on the interior face of the carriage.
Fine-Tuning Door Alignment
Start by closing the door completely and observing how it sits. If the top edge is higher on one side, the roller on that side is set too high. If the bottom edge shows gaps, the roller is too low. Make small adjustments in quarter-turn increments and test the door after each change.
If your door has tandem rollers, adjust both wheels equally unless you observe uneven wear patterns. Equal height across both rollers distributes weight evenly and extends the life of your sliding door wheels.
Most doors that feel “stuck” can be freed with adjustment alone. If adjustment doesn’t improve operation after several attempts, the rollers themselves are likely worn and replacement is necessary.
Sliding Door Roller Replacement: Step-by-Step Installation
When adjustment doesn’t restore smooth operation, your sliding door wheels need replacement. This process is straightforward for most residential doors and requires only basic tools.
Tools and Materials You’ll Need
Gather these items before starting:
- Adjustable wrench or Phillips screwdriver
- Tape measure
- Flathead screwdriver for prying if needed
- Cloth or small brush for track cleaning
- Lubricant suitable for your new wheels
- Your replacement roller assembly (ordered with correct dimensions)
Measuring Roller Diameter and Housing Width
Before ordering replacement sliding door wheels, measure two critical dimensions: the roller diameter (the width of the wheel itself) and the housing width (the distance across the carriage from outer edge to outer edge).
Roller diameter is straightforward; place a tape measure across the wheel and note the measurement in millimetres. Standard sizes are 19mm, 22mm, 25mm, and 32mm. Housing width typically ranges from 50mm to 80mm, depending on the door’s age and manufacturer.
Take a photograph of your current roller and note these two measurements clearly. When contacting a supplier, providing both the photo and measurements ensures you receive the exact part your door requires.
Installation Steps for Single and Tandem Assemblies
Step 1: Remove the Door from the Track
Open the door fully and lift it straight up with steady pressure. The door should lift clear of the bottom track and rest against the upper track. If it resists, lower the rollers slightly using the adjustment screws, then try again. Once lifted, tilt the top of the door away from the frame slightly and lift it free of the upper track. Place the door on a flat surface, resting it on something that protects the glass and frame.
Step 2: Access and Remove the Old Roller
With the door horizontal, locate the fasteners holding the carriage to the door frame. These are typically Phillips or hex screws positioned on the inside of the carriage. Remove all fasteners, usually two or four per carriage. Keep these screws safe if you’re reusing them; if they’re corroded or damaged, replace them with new stainless steel fasteners of the same size.
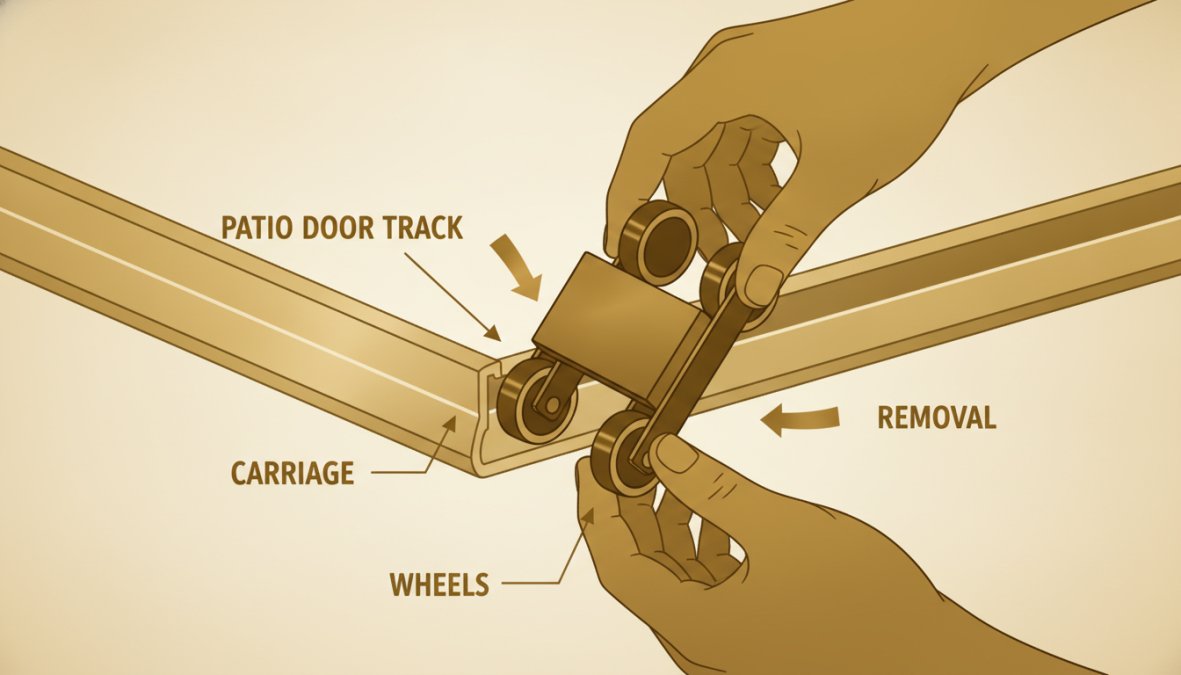
Carefully slide the old carriage and roller assembly out of the track. Inspect the track itself for damage or excessive wear.
Step 3: Install the New Roller Assembly
Position the new carriage at the end of the track and slide it in carefully. The wheels should sit in the track groove naturally. Align the mounting holes on the carriage with the mounting holes on the door frame. Insert the fasteners and tighten them firmly but not excessively.
Step 4: Lubricate the New Wheels
Before reinstalling the door, apply lubricant to the new wheels. Use a silicone-based lubricant or PTFE dry lubricant. Work the lubricant into the wheel bearing by rotating each wheel by hand several times.
Step 5: Reinstall the Door
Carefully lift the door and position it so the upper track channel aligns with the upper roller or track guide. Lower the door gently, allowing the bottom rollers to settle into the bottom track. Close the door completely and observe its operation. It should glide smoothly without binding or sticking.
Never force a door that binds or resists during installation. Forcing it can damage the new wheels or the track. Stop, reassess the alignment, and make adjustment corrections before proceeding.
Sliding Door Maintenance Tips and Lubrication Schedule
Once you’ve replaced your sliding door wheels or adjusted your existing ones, a maintenance routine keeps them operating smoothly for years. Regular cleaning and lubrication prevent the accumulation of debris that causes binding and premature wear.
Regular Track Cleaning and Inspection
Inspect your door’s track monthly, particularly if your home is near the coast or in a dusty area. Use a dry cloth or soft brush to remove loose debris from the track groove. For stubborn buildup, a damp cloth works well; wipe the track dry afterward to prevent rust on steel components.
Avoid high-pressure water or harsh chemicals, which can force water into bearing seals and cause corrosion. Visually inspect the wheels themselves for flat spots, cracks, or visible wear patterns. Uneven wear on one side of a wheel often indicates misalignment.
Maintenance Intervals for Australian Climates
In Perth and other coastal regions, increase your maintenance frequency. The combination of salt air, dust, and humidity accelerates wear on sliding door wheels. Inspect your door’s track and wheels every two months and lubricate every three months.
Inland areas with lower humidity can operate on a standard six-month lubrication schedule. If your door experiences heavy use, lubricate every three months regardless of location.
Best Sliding Door Wheel Lubricants and Products
Choosing the right lubricant is as important as choosing the right wheels. Different lubricant types serve different purposes, and the wrong choice can actually accelerate wear or attract dirt.
Lubricant Types: Silicone, PTFE, and Dry Lubricants
Silicone-based lubricants are water-resistant and work well in humid environments. They don’t attract dust as readily as oil-based products, making them ideal for coastal installations.
PTFE (polytetrafluoroethylene) dry lubricants create a slippery coating that reduces friction without oily residue. They work particularly well on nylon wheels, where they significantly reduce squeaking.
Dry lubricants in powder or aerosol form are the premium option for residential doors. Avoid general-purpose machine oils, which attract dust and can gum up the mechanism. Never use WD-40 as a primary lubricant; it evaporates quickly and doesn’t provide lasting protection.
Application Techniques and Frequency
Apply lubricant directly to the wheel bearing where the wheel rotates on its axle. For spray lubricants, a short burst is sufficient; excessive application just creates mess and attracts dust. Rotate the wheel by hand several times after application to work the lubricant into the bearing.
The frequency of lubrication depends on your climate and door usage. In Perth’s coastal environment, every three months is appropriate for residential doors. Commercial doors that operate frequently benefit from monthly lubrication.
Keep a small bottle of your chosen lubricant near your sliding door. When you notice the door becoming less smooth, a quick application often restores operation without waiting for your scheduled maintenance interval.
Troubleshooting Common Sliding Door Wheel Problems
Most sliding door issues trace back to roller problems, but not all sticky doors require replacement. Understanding common problems and their solutions saves money and time.
Why Sliding Doors Stick or Jam
A door that requires force to open usually has one of three issues: misalignment, debris accumulation, or worn wheels. Start by cleaning the track thoroughly; this often solves the problem. If cleaning doesn’t help, adjust the rollers to correct any misalignment.
Squeaking indicates the wheels need lubrication. Apply lubricant and the noise usually disappears immediately. If squeaking returns within days, you may have worn wheels that aren’t holding lubricant properly; replacement is the solution.
A door that tilts or rocks side-to-side has unequal roller heights. A door that won’t close all the way often has rollers set too high, causing the door to bind at the top of the frame. Lower the rollers slightly and test.
Grinding sounds suggest debris in the track or severe wheel damage. Stop using the door immediately and inspect the rollers closely. Clean the track thoroughly first; if grinding persists after cleaning, the wheels need replacement.
OEM vs Universal Compatibility: What You Need to Know
OEM (original equipment manufacturer) rollers are designed specifically for your door’s brand and model. They fit perfectly but can be difficult to source, particularly for older doors, and they’re often more expensive than universal alternatives.
Universal rollers fit a range of door types and housing widths. They’re widely available and typically cost less than OEM parts. However, universal doesn’t mean "one-size-fits-all"; you still need to match the roller diameter and housing width precisely.
For most Australian doors, quality universal rollers perform identically to OEM alternatives. When ordering, provide both the door brand (if you know it) and the measured dimensions to ensure you receive a genuinely compatible roller.
Adjustment vs Replacement: When to Do Each
The decision between adjusting and replacing your sliding door wheels depends on what you observe when you inspect them.
Adjust your rollers if:
- The door operates with some sticking but no grinding sounds
- Cleaning the track improves operation noticeably
- The wheels appear intact with no visible cracks or flat spots
- Adjustment screws exist and are accessible
Replace your rollers if:
- You see visible cracks, flat spots, or severe wear on the wheels
- Grinding sounds persist even after track cleaning
- Adjustment produces no improvement after multiple attempts
- The wheels are corroded or show signs of rust
Many people jump straight to replacement when adjustment would solve the problem. Conversely, some attempt adjustment repeatedly when the wheels are clearly worn. Inspect your wheels carefully; if they look damaged, replacement is the right choice. If they look intact, adjustment is worth attempting first.
The cost of adjustment is zero. If you’re uncertain, clean the track and adjust first. If that doesn’t work, you’ve lost nothing but time, and you’ll have confirmed that replacement is necessary.
Identifying the right sliding door wheels for your installation prevents costly ordering mistakes and ensures smooth operation for years. Whether you’re adjusting existing rollers or installing new ones, the process is straightforward when you have accurate measurements and understand your door’s configuration. Our team can identify your exact roller requirements from a photograph and supply compatible replacements with fast dispatch. We stock wheels for all major Australian door brands and offer expert guidance via email to ensure you receive the right components first time.
Frequently Asked Questions
How do I know which sliding door wheels I need?
Identify your roller type by examining the wheel profile (concave or convex), measuring the roller diameter and housing width, and checking whether your door uses single or tandem roller assemblies. Note the material, steel, nylon, or ball bearing, and verify OEM compatibility with your door brand. Take a photo of your existing roller and compare it to product specifications, or contact a hardware specialist for expert identification.
Can you replace sliding door wheels without professional help?
Yes, most homeowners can replace sliding door wheels with basic tools and careful measurement. Remove the door from its track, unscrew the old roller carriage, install the new one, and reattach the door. The key is ensuring correct roller diameter and housing width to avoid compatibility issues. If your door is heavy or the track is damaged, professional assistance may be worthwhile.
What's the difference between adjustment and replacement for sliding door rollers?
Adjustment involves turning the adjustment screw to raise or lower the door and improve alignment, this fixes minor sticking or misalignment. Replacement is needed when wheels are worn, cracked, or no longer roll smoothly despite adjustment. If your door still sticks after adjustment or the wheels look visibly damaged, replacement is the correct solution.
How often should I lubricate sliding door wheels?
Lubricate your sliding door wheels every 3-6 months, or more frequently in dusty or coastal Australian environments. Use silicone spray, PTFE-based lubricants, or dry lubricants designed for door hardware. Clean the track thoroughly before applying lubricant to prevent dirt buildup. Regular maintenance extends wheel life and keeps doors operating smoothly.
Are all sliding door rollers universal, or do I need OEM parts?
Not all rollers are universal. Compatibility depends on roller diameter, housing width, wheel profile, and your specific door brand. While some universal options exist, OEM (original equipment manufacturer) parts guarantee perfect fit. Always verify compatibility before purchasing, as installing incorrect rollers can cause misalignment and further damage.
What tools do I need to replace sliding door wheels?
You'll typically need a screwdriver set, adjustable wrench, measuring tape, and a spirit level. A flathead screwdriver helps remove the door from its track, while a Phillips head works for carriage bolts. For stubborn screws, a power drill may help. A soft mallet can assist in gentle removal if parts are stuck. Most replacements don't require specialised tools.
This article was written using GrandRanker