
Table of Contents
- Understanding Sliding Screen Door Locks
- How to Install a Sliding Screen Door Lock
- Sliding Screen Door Security Bar: Enhanced Protection
- Child Proof Sliding Screen Door Lock Options
- Replacement Parts and Material Finishes
- Troubleshooting and Maintenance
- Finding the Right Replacement Lock for Your Door
- Conclusion
Sliding Screen Door Lock: Security & Installation Guide
Last Updated: July 12, 2026
A sliding screen door lock is a small hardware component that makes an enormous difference in your home’s security and usability. Most Australians don’t realise how many options exist or how straightforward it is to upgrade or replace one. Below, we’ll show you how to measure, select, and install the right lock for your door.
The most common mistake is ordering a replacement lock without checking your door’s thickness and screw hole spacing. Take these measurements before you buy, it takes five minutes and saves you a return trip.
Understanding Sliding Screen Door Locks
A sliding screen door lock combines three core elements: the latch mechanism, the strike or keeper plate, and the handle that activates it. When you turn the handle, an internal cam rotates and retracts the latch, allowing the door to slide freely. This simple design masks real variation in materials, finishes, and installation methods. A basic plastic-housed latch works for lightweight screen doors, while a heavy-duty steel latch handles patio doors that take real punishment.
Types of Sliding Screen Door Latches
Latches come in two main categories: mortise and surface mount. A mortise latch sits inside a cavity routed into the door frame and is standard for most residential screen doors built after the 1980s. A surface mount latch screws directly onto the frame face and is easier to retrofit.
Within mortise latches, you’ll find handed and non-handed types. A handed latch is designed for left-opening or right-opening doors; installing it backwards won’t work. A non-handed (universal) latch works on either side because the mechanism doesn’t depend on door swing direction.
Housing material matters too. Diecast metal housings offer durability and a solid feel. Plastic housings keep costs down and work well for interior screen doors. Steel latch bolts resist bending and corrosion far better, especially important in coastal climates.
Non-handed latches are worth the extra cost if you’re uncertain about your door’s opening direction, they work either way and eliminate installation errors.
Strike and Keeper Components
The strike plate (keeper) is the receiving end of the latch system. When the door closes, the latch bolt extends into a hole in the strike plate, holding the door shut. The strike must align precisely with the latch bolt, or the door won’t latch smoothly.
Strike plates come in two styles: standard and adjustable. A standard strike is fixed once installed. An adjustable strike has a slotted bolt hole that lets you shift the plate slightly without removing it, invaluable when retrofitting a new latch to an older frame.
Proper screw spacing is critical. Strike plates are drilled for specific screw centres, typically 64mm or 76mm apart on Australian residential doors. Measure the distance between old screw holes before ordering; wrong spacing means drilling new holes, which weakens the frame.
How to Install a Sliding Screen Door Lock
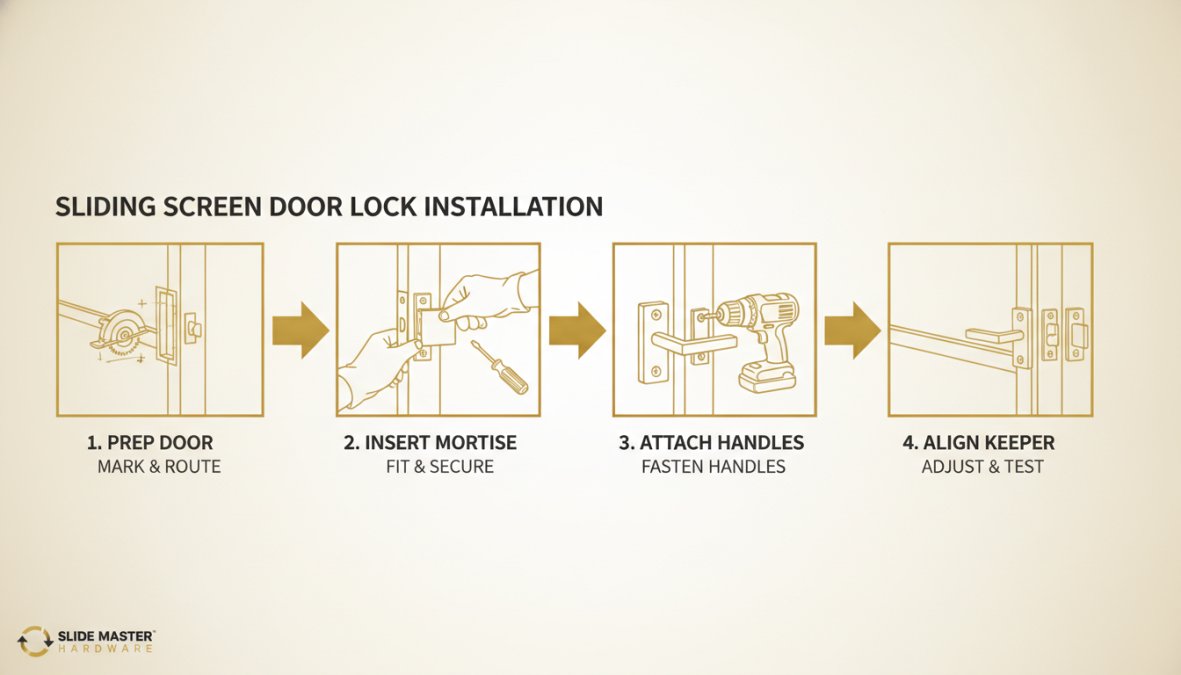
Installation depends on whether you’re working with a mortise or surface mount system. Mortise installation requires routing a cavity into the door frame. Surface mount is quicker but less elegant because the hardware sits on top of the frame.
Measuring Hole Centres and Compatibility
Before you touch a drill or chisel, measure your existing latch or strike plate. Locate the screw holes and measure the distance between them, this is your hole centre spacing. Most Australian residential doors use 64mm centres, but older doors sometimes use 76mm.
Measure your door thickness by sliding a ruler into the gap where the door meets the frame. Latch housings are designed for specific thickness ranges; a latch rated for 35-50mm doors won’t fit a 45-60mm frame properly.
Check your door opening direction by standing inside and noting whether the door slides left-to-right or right-to-left. If replacing a latch, photograph the old one before removing it to confirm whether you need a left-handed, right-handed, or non-handed replacement.
Surface Mount vs. Mortise Installation
Surface mount installation is straightforward. Position the latch housing against the inside face of the door frame, mark the screw holes, drill pilot holes, and screw it down. The handle assembly bolts through the frame to the latch body. This method works on any frame thickness and requires no routing, but the hardware is visible and protrudes slightly.
Mortise installation demands precision. You’ll need to route a rectangular cavity into the door frame that exactly matches the latch body dimensions. Mark the outline of the latch body on the inside of the frame using the old latch as a template. Clamp the frame securely to a workbench. Use a router with a straight bit set to the exact depth of the latch body (usually 25-35mm). Route in multiple shallow passes rather than one deep cut for better control.
Step-by-Step Installation Process
Step 1: Gather tools and materials. You’ll need a drill, drill bits, screwdriver, chisel or router (for mortise work), sandpaper, and the new latch and strike plate assembly.
Step 2: Remove the old latch. Unscrew the handle assembly from both sides of the frame. Remove the latch body by unscrewing it from inside the mortise. Clean out debris or old sealant.
Step 3: Measure and mark the new latch position. Use your measurements to position the new latch and mark the outline on the frame with a pencil.
Step 4: Route or prepare the cavity. For mortise installation, route the cavity to the correct depth. For surface mount, mark and drill the screw holes.
Step 5: Install the latch body. Slide the latch into the mortise (or align it on the surface) and secure with screws. Check that the bolt extends and retracts smoothly.
Step 6: Install the strike plate. Position the strike so the latch bolt enters its hole cleanly when the door closes. Mark screw holes and secure the strike. Test the door closure.
Step 7: Install the handle assembly. Bolt the handle to the latch body from both sides of the frame. Ensure the handle turns freely and the latch bolt extends and retracts fully.
Step 8: Test and adjust. Open and close the door several times. If the door binds or the latch doesn’t catch, check strike alignment and adjust as needed.
If you’re routing a mortise cavity, do not rush the depth measurement. A cavity that’s too shallow will prevent the latch from sitting flush, and the door won’t close properly. Measure three times, route once.
Sliding Screen Door Security Bar: Enhanced Protection
A sliding screen door lock provides basic security, but a security bar adds a physical barrier that’s harder to defeat. A security bar is a horizontal rod or brace that sits in the track of the door, preventing it from sliding open even if someone forces the latch.
A determined intruder can force most standard latches. A security bar makes forced entry much harder because it blocks the entire sliding mechanism. Even if the latch breaks, the door won’t move. Security bars are especially valuable for ground-floor screen doors, patio doors in less-visible areas, and homes that sit empty during the day.
The bar itself is usually steel or aluminium, between 20-40mm in diameter, and cut to fit your specific door width. Measure your door’s opening width, the distance between the inside faces of the frame where the door slides. Most residential sliding doors range from 700mm to 1200mm wide. If your measurement falls between standard sizes, choose the next size up and trim the bar to fit, or order a custom-cut bar.
Consider whether you want a fixed or adjustable bar. A fixed bar is cheaper and simpler. An adjustable bar costs more but lets you remove it quickly if you need full access. For coastal weather, stainless steel resists corrosion better than standard steel.
Child Proof Sliding Screen Door Lock Options
Families with young children need locking mechanisms that keep doors secure while preventing kids from accidentally opening them. A standard sliding screen door lock is often within reach of a curious toddler.
A keyed sliding screen door lock is the most secure option for child safety. The key requirement means a child can’t open the door without adult intervention. A secondary latch positioned higher on the door frame, above a child’s reach, adds protection without requiring a key. Install it 1200-1400mm above the floor.
A sliding bolt or barrel bolt, installed horizontally across the inside of the door, is a manual but effective child-proof option. The bolt slides into a keeper mounted on the frame, physically blocking the door from opening.
Install any secondary locking mechanism at a height genuinely out of reach for your child. If your child is 1 metre tall, install the secondary latch at least 1.3 metres high. Test the mechanism yourself before relying on it. If you use a keyed lock, establish a clear protocol for where the key lives. Supervision remains your first line of defence.
Replacement Parts and Material Finishes
Over time, individual components wear out. Rather than replacing the entire assembly, you can often order replacement parts: a new latch body, handle, or strike plate. This saves money and is faster than full reinstallation.
Durable Materials: Steel, Diecast and Plastic Housing
Steel is the gold standard for latch bolts and strike plates. Steel resists bending, doesn’t corrode easily (especially stainless steel), and lasts decades with minimal maintenance.
Diecast metal housings are stronger than plastic and look more professional. Diecast is an aluminium alloy poured into a mould, creating a solid, uniform structure. Plastic housings are lightweight and inexpensive but can warp in direct sunlight or extreme heat. For exterior patio doors or high-use areas, diecast or steel housings are worth the investment.
Available Finishes: Black, White, Brass and Chrome
Black (usually powder-coated steel or anodised aluminium) is modern, neutral, and hides fingerprints well. White finishes suit traditional or cottage-style doors but can yellow over time in direct sunlight. Brass finishes are warm and classic, popular on heritage homes, but softer than steel and can scratch. Chrome finishes are shiny and reflective but show fingerprints readily.
Choose a finish that matches your existing hardware, handles, and hinges. Mismatched finishes look accidental rather than intentional.
Coastal Perth homes benefit from stainless steel or chrome finishes, which resist salt corrosion far better than plain steel or brass. If you live near the ocean, invest in corrosion-resistant materials.
Troubleshooting and Maintenance
Most problems are simple to diagnose and fix without replacing the entire mechanism.
Common Issues and Quick Fixes
The door won’t latch. The latch bolt extends but doesn’t catch the strike plate. Check alignment: close the door and look at where the bolt meets the strike. If the bolt misses the hole, loosen the strike screws and slide it until the bolt enters cleanly.
The door is hard to close. The latch bolt is catching on the strike plate rather than sliding smoothly into it. Loosen the strike and shift it fractionally until the door closes with minimal force.
The handle is loose or wobbly. The bolts connecting the handle to the latch body have loosened. Tighten them with a screwdriver. If the handle still moves, the bolt holes might be stripped and require a new handle or latch body.
The latch bolt sticks and doesn’t retract. Debris or dried lubricant inside the latch housing is binding the mechanism. Spray silicone lubricant or WD-40 into the latch opening and work the handle back and forth several times.
The door slides open on its own. The latch isn’t catching the strike, or the strike isn’t holding the bolt securely. Confirm the latch is extending fully by manually pushing the handle. Check strike position and adjust if needed.
Keeping Your Lock in Top Condition
Lubricate your sliding screen door lock twice a year, especially if exposed to weather. Use silicone-based lubricant or light machine oil. Spray a small amount into the latch opening and work the handle several times. Avoid heavy grease, which attracts dust.
Clean the latch and strike plate quarterly, especially in coastal or dusty areas. Wipe with a damp cloth to remove salt spray, dust, or debris. Dry immediately to prevent corrosion. Inspect the strike plate screws twice a year and tighten any loose screws immediately. Test your lock monthly by opening and closing the door several times.
Finding the Right Replacement Lock for Your Door
Selecting a replacement sliding screen door lock starts with understanding your current setup and what you’re trying to achieve. Are you replacing a worn-out latch with an identical part, or upgrading to a better lock?
Compatibility Guide: Door Thickness and Screw Spacing
Before you shop, gather these measurements:
-
Door thickness: Measure the thickness of your door frame at the point where the latch sits. Standard Australian residential doors are usually 35mm, 40mm, or 45mm thick.
-
Screw hole spacing: Measure the distance between the screw holes on your existing latch or strike plate. Most Australian doors use 64mm centres. Some older doors use 76mm.
-
Door opening direction: Note whether your door slides left-to-right or right-to-left when opening.
-
Bolt projection: Measure how far the latch bolt extends past the inside face of the frame.
| Measurement | Standard Value | Why It Matters |
|---|---|---|
| Door thickness | 35-45mm | Determines latch body size and bolt length |
| Screw hole spacing | 64mm or 76mm | Ensures new latch aligns with existing frame holes |
| Bolt projection | 10-12mm | Ensures bolt catches strike plate reliably |
| Door opening direction | Left-to-right or right-to-left | Determines if latch is handed or non-handed |
Once you have these measurements, you can confidently order a replacement that will fit first time.
Non-Handed vs. Adjustable Latch Components
A non-handed (universal) latch works on doors that open either direction. The internal mechanism doesn’t depend on which way the door swings, so you can install it confidently. Non-handed latches cost slightly more but the peace of mind is worth it if you’re uncertain.
An adjustable latch lets you fine-tune the bolt projection after installation. This is invaluable if your frame has shifted or you’re retrofitting to an older door where the strike sits fractionally deeper or shallower than standard.
Securing your sliding screen door properly protects your home and gives you peace of mind. Whether you’re addressing a worn-out latch, upgrading for security, or installing a new door, understanding the components and installation process removes the mystery from the task. The right sliding screen door lock fits your door precisely, operates smoothly, and lasts for years with minimal maintenance.
Frequently Asked Questions
How do you lock a sliding screen door from the outside?
Most sliding screen door locks operate from the inside by engaging a latch mechanism that connects to a strike or keeper plate. For external security, consider installing a sliding screen door security bar or deadbolt-style locking handle. Ensure your chosen sliding screen door lock has an adjustable latch that aligns properly with the strike plate for reliable operation and smooth engagement.
What is the best type of lock for a sliding screen door?
The best sliding screen door lock depends on your needs. For basic security, a mortise latch with steel construction offers durability. For enhanced protection, a sliding screen door security bar provides physical reinforcement. Consider heavy-duty diecast or steel components with non-handed designs for flexibility. Check compatibility with your door thickness and hole centre spacing before purchasing replacement parts.
Can you add a lock to an existing sliding screen door?
Yes, you can add a sliding screen door lock to an existing door. Measure your door thickness, screw spacing, and hole centres to ensure compatibility. Choose between surface mount (easier installation) or mortise (more secure) options. Most replacement locks are adjustable and work with standard patio door hardware. If unsure about measurements, expert identification services can help you select the exact hardware needed.
Are child proof sliding screen door lock options effective?
Child proof sliding screen door locks are effective when properly installed and combined with other safety measures. Look for locking mechanisms positioned high on the door frame, out of reach of young children. Adjustable latch components with secure engagement are essential. Pair your sliding screen door lock with a security bar for maximum protection, and ensure smooth operation so the lock functions reliably every time.
This article was written using GrandRanker