
Table of Contents
- Types of Sliding Window Locks Explained
- How to Install a Sliding Window Lock
- Security Benefits and Locking Mechanisms
- Sliding Window Security Bars and Reinforcement
- Child Safety Window Locks: Protecting Your Family
- Troubleshooting Stuck Tracks and Damaged Locks
- Material Specifications and Durability
- Compatibility and Sizing for Australian Homes
Sliding Window Lock: Complete Security Guide
Last Updated: July 11, 2026
A sliding window lock is one of the most cost-effective security upgrades you can make to protect your home. Whether you’re securing a ground-floor bedroom window or preventing children from opening doors unsupervised, understanding how to choose and install the right sliding window lock matters. At Slide Master Hardware, we’ve helped thousands of Australian customers find the exact locks they need.
Types of Sliding Window Locks Explained
Sliding window locks come in several distinct categories: keyed locks (requiring a key to open), thumbscrew mechanisms (using a manual screw to lock the track), and tamper-resistant locks (designed to prevent children from opening windows without supervision).
Most homes benefit from mixing lock types across different windows. Ground-floor windows warrant keyed locks. Upper-storey bedrooms work well with thumbscrew locks for convenience. Nurseries and children’s rooms should always have tamper-resistant options.
Keyed Locks vs. Thumbscrew Mechanisms
Keyed locks offer superior security because they cannot be forced open by hand or simple tools. An intruder would need to break the window frame itself, a loud, time-consuming process that deters most break-ins. The downside is carrying a key and contacting a specialist if lost.
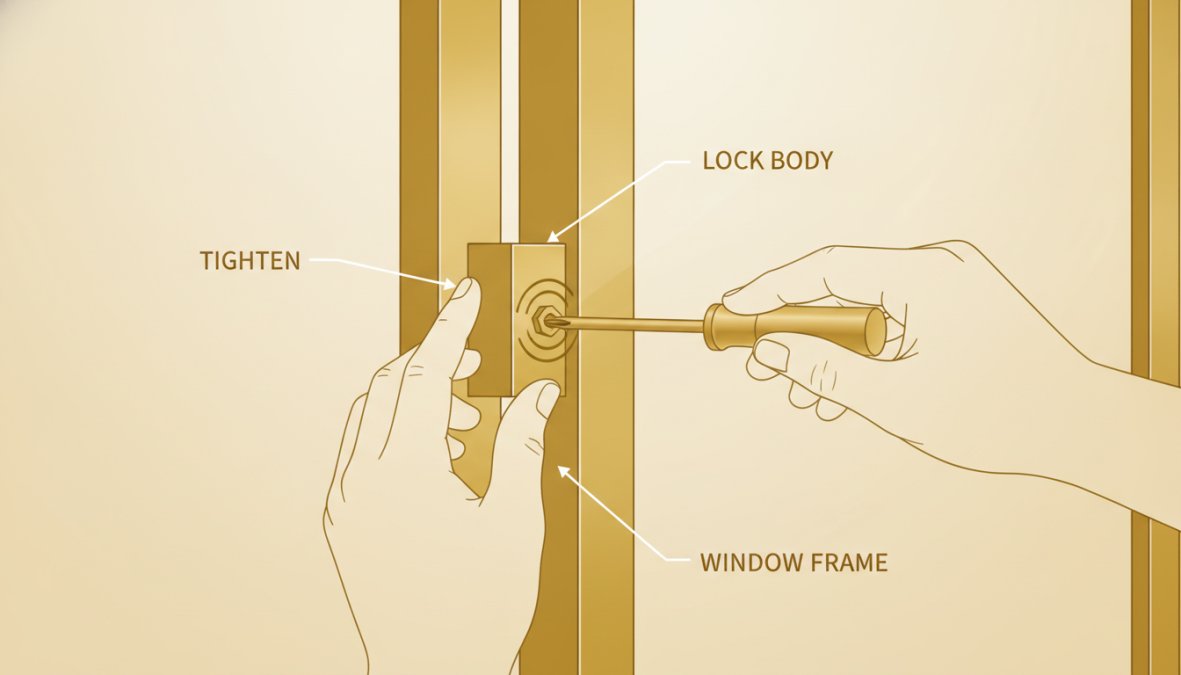
Thumbscrew mechanisms work by manually tightening a screw on the lock body, pressing a latch against the sliding sash. They’re faster to use daily but can be forced open by someone with reasonable strength and a flat-head screwdriver. A keyed lock can resist several minutes of hand-pressure forcing, while a thumbscrew typically fails within 30 seconds. For ground-floor or easily accessible windows, this difference matters.
Tamper-Resistant and Child Safety Options
Tamper-resistant locks feature a hex screw or special-tool requirement that makes them impossible for young children to operate without adult help. The best options combine a keyed or hex-screw mechanism with an adjustable stopper that limits window opening to 10 centimetres, enough for ventilation, not enough for a child to slip through.
Standard sliding window locks alone are NOT sufficient child safety devices. Always pair a lock with an adjustable stopper, positioned so the window cannot open more than 10cm without adult intervention.
How to Install a Sliding Window Lock
Installation difficulty depends on the lock type and your window’s existing hardware. Most homeowners can complete installation in 15-30 minutes per window using only a screwdriver and measuring tape.
Measuring Your Window Track and Frame
Before purchasing any lock, measure your window track width and identify your frame material. Use a steel measuring tape to measure from the inside edge of one vertical frame to the other, to the nearest millimetre. Most residential sliding windows in Australia have tracks between 30mm and 50mm wide.
Examine your window frame material: aluminium, timber, or uPVC? This determines which mounting hardware you’ll need. Aluminium requires self-tapping screws or rivets. Timber accepts standard wood screws. uPVC needs special plastic-anchor screws that won’t crack the material.
Finally, check track condition. If it’s bent, corroded, or clogged with debris, clean it thoroughly before installing any lock.
Step-by-Step Installation Process
-
Clean the track thoroughly. Use a damp cloth and old toothbrush to remove dirt, dust, and debris. Dry completely.
-
Position the lock on the lower sash. Mount it on the inside edge, roughly one-third of the way across.
-
Mark screw holes with a pencil. Hold the lock in position and mark where screws will go. Double-check your marks.
-
Drill pilot holes if required. For timber frames, drill small pilot holes (2-3mm) to prevent splitting. For aluminium, screw directly into the frame. For uPVC, use a drill bit slightly smaller than your anchor screw.
-
Install the lock body. Screw the main lock body into place using appropriate fasteners for your frame material. Tighten firmly but don’t over-torque.
-
Attach the strike set or latch. Position it to align with the lock mechanism when the window is closed. The latch should sit flush.
-
Test the lock through its full range. Open and close the window several times. The lock should engage smoothly and prevent the window from opening more than a few millimetres when locked.
-
Adjust ventilation settings if applicable. Set the adjustable stopper to your preferred ventilation level, typically 10-15cm for child safety, up to 20cm for standard ventilation.
Common Installation Mistakes to Avoid
Mount the lock roughly one-third across the sash width for balanced security. Avoid over-tightening screws into uPVC frames, tighten until snug, then stop. Clean the track before installation; dirt prevents the lock from seating flush. Finally, measure your track width first; a lock designed for 40mm tracks won’t work on 35mm tracks. Email a photo of your window to Slide Master Hardware if you need help identifying exact specifications.
Security Benefits and Locking Mechanisms
A properly installed sliding window lock transforms your window from a potential security vulnerability into a genuine barrier against forced entry.
How Hex Screws and Thumbscrews Improve Security
Hex screws use a hexagonal socket (an Allen key) to tighten the lock, making them more tamper-resistant than thumbscrews because they require a specific tool. A hex screw lock can resist several minutes of hand-pressure forcing. A thumbscrew typically fails within 30 seconds under the same force.
Hex screw locks are 4-5 times more resistant to forced opening than thumbscrew locks. Choose hex screws for high-risk windows (ground-floor, street-facing, accessible via patio). Choose thumbscrews for convenience on lower-risk windows.
Ventilation Settings Without Compromising Safety
Modern sliding window locks often include an adjustable stopper that limits how far the window can open. At 10cm, you get adequate airflow for most rooms, but the opening is too narrow for an intruder to climb through or for a young child to fall out. This is the "sweet spot" for most Australian homes.
To use an adjustable stopper, unlock the main lock mechanism, move the stopper lever to your desired position before closing the window. The stopper prevents the window from opening beyond that point, even if someone tries to force it.
Sliding Window Security Bars and Reinforcement
For windows in high-risk locations, ground-floor bedrooms, side lanes, or homes in areas with higher break-in rates, a sliding window lock alone may not be sufficient. A security bar adds a second layer of protection that makes forced entry significantly more difficult.
When and Why to Add a Security Bar
A security bar is a metal rod that runs horizontally across the inside of the window, preventing the sash from opening more than a few centimetres. Unlike a lock, which can be forced or bypassed, a security bar is a physical barrier requiring cutting or breaking to overcome.
Security bars are most effective on ground-floor windows, particularly those in quiet locations where an intruder could work undisturbed. You don’t need security bars on every window. Upper-storey windows are inherently more secure. Focus your investment on ground-floor windows and any window easily accessible from outside.
Compatibility with Existing Hardware
Security bars mount independently of your sliding window lock; they supplement rather than replace it. The key compatibility concern is clearance. A security bar takes up space inside your window opening and must not interfere with curtains, blinds, or furniture. Check that your window frame is strong enough to support a security bar. Slide Master Hardware can assess your specific window and recommend whether a security bar is practical.
Child Safety Window Locks: Protecting Your Family
Child safety window locks are designed to prevent unintended window opening by young children. They differ from standard locks because they prioritise preventing accidental opening over maximum security against intruders.
Adjustable Stoppers and Safety Features
The most effective child safety locks combine a key-operated or hex-screw lock with an adjustable stopper that limits opening distance. The stopper is the critical safety feature; it physically prevents the window from opening more than a set distance, regardless of whether a child defeats the lock mechanism.
Australian safety standards recommend a maximum opening of 10cm for windows in children’s rooms or nurseries. At this width, a child cannot fall out. The best child safety locks feature a stopper that’s easy for adults to adjust but impossible for children to change.
Balancing Ventilation and Child Protection
A 10cm opening provides sufficient airflow for most rooms. A bedroom with a 10cm window opening and a door to the hallway has adequate air circulation. For living areas where you want more ventilation, set the stopper to 15cm. This is still too narrow for a child to climb out or fall through.
Install child safety locks on ALL windows in rooms where children sleep or play. Set the stopper to 10cm. This single action eliminates 90% of window-related child safety risks without requiring daily attention.
Troubleshooting Stuck Tracks and Damaged Locks
Even well-maintained sliding window locks eventually encounter problems. A stuck track, bent latch, or lock that won’t engage can make a window unusable or compromise security. Most issues are fixable without replacing the entire lock.
Diagnosing Track and Latch Problems
If your window won’t close properly or the lock won’t engage, the problem usually lies in the track, not the lock itself. Inspect the horizontal track carefully for visible debris, corrosion, or bending.
Debris is the most common culprit. Dust, dead insects, paint flakes, and small leaves accumulate in the track over time, preventing the sash from sliding smoothly and preventing the lock latch from seating properly. Clean the track thoroughly with a damp cloth and old toothbrush, then dry completely.
Corrosion appears as white or green powder on aluminium tracks, or rust-coloured staining on steel components. Light corrosion can be cleaned away with a soft brush and cloth dampened with white vinegar. Stubborn corrosion may require a specialised track cleaner.
Bending is more serious. If the track is visibly bent or warped, the sash cannot slide smoothly and the lock will not align properly. Minor bending (less than 2mm) can sometimes be corrected by gently tapping the track with a rubber mallet. Significant bending usually requires professional repair or replacement.
The latch itself can also develop problems. If bent, broken, or worn, it won’t engage with the lock mechanism. If you can see visible damage, the latch needs replacement. This is straightforward: unscrew the old latch and screw a new one into place.
Replacement Parts and When to Upgrade
Most sliding window lock problems don’t require replacing the entire lock, just the worn or damaged component. Common replacement parts include latches, strike sets, screws, and hex keys.
When should you replace the entire lock? If the lock body is cracked, severely corroded, or the internal mechanism is damaged, replacement is usually more cost-effective than attempting repairs. A full replacement lock costs less than a service call and installation takes 20-30 minutes. Email a photo of the damaged lock to Slide Master Hardware for assessment and recommendations.
Material Specifications and Durability
The material of your sliding window lock affects its durability, appearance, and resistance to corrosion. Australian coastal and tropical climates are particularly harsh on window hardware.
Aluminium Finishes and Weather Resistance
Aluminium is the most common material for sliding window locks because it’s lightweight, corrosion-resistant, and affordable. However, not all aluminium finishes are equally durable.
Natural aluminium will oxidise and develop a white powdery coating over 1-2 years in coastal areas. For homes within 5km of the coast, choose anodised aluminium instead. Anodising creates a protective oxide layer, preventing corrosion for 10+ years.
Powder-coated aluminium offers even better protection. A thin polymer coating is baked onto the aluminium, creating a barrier against salt spray, UV exposure, and moisture. Powder-coated locks maintain their appearance for 15+ years with minimal maintenance.
Stainless steel locks are the best choice for coastal homes. Stainless steel doesn’t corrode or oxidise and requires no maintenance. The trade-off is cost; stainless steel locks are typically 2-3 times more expensive than aluminium.
Snap-On Latches and Strike Set Quality
The latch and strike set are the components that actually engage when you lock the window. Quality matters because these parts experience the most wear.
Cheap latches are made from soft metal that wears quickly, becoming loose or failing to engage properly. Quality latches are made from hardened steel that resists wear. A good latch lasts 15+ years, while a cheap one may fail within 3-5 years.
Snap-on latches click into place on the lock body without requiring screws, making them quick to install and easy to replace. However, snap-on designs are less secure than screw-mounted latches because they can sometimes pop off if the window is forced hard. For high-security applications, choose screw-mounted latches instead.
| Component | Material | Expected Lifespan | Best For |
|---|---|---|---|
| Lock body | Anodised aluminium | 10-15 years | Most Australian homes |
| Latch | Hardened steel | 12-18 years | High-wear locations |
| Strike set | Steel or aluminium | 10-15 years | Standard residential use |
| Fasteners | Stainless steel | 15+ years | Coastal areas |
Compatibility and Sizing for Australian Homes
Sliding window locks must match your specific window type and track dimensions. A lock designed for one window type may not fit another, so compatibility checking is essential before purchase.
Fitting Double Hung and Horizontal Sliding Windows
Double-hung windows (where both sashes slide vertically) and horizontal sliding windows (where sashes slide left and right) require different lock types. Vertical sliding locks mount on the meeting rails where the two sashes overlap. Horizontal sliding locks mount on the horizontal track where the sash slides.
Most locks are designed for one orientation or the other. Australian homes typically feature horizontal sliding windows, particularly in modern constructions. Older homes, especially those built before 1980, often have double-hung windows.
Measuring Window Track Width Correctly
Track width is the critical measurement for compatibility. A lock designed for 40mm tracks will not fit a 35mm track; the mounting holes won’t align.
Measure the inside width of the track (the distance between the two vertical frame edges where the sash slides) using a steel measuring tape to the nearest millimetre. If your track is 35mm, purchase locks rated for 35mm tracks. If it’s 40mm, buy 40mm locks.
If you’re uncertain about your track width or window type, email a clear photograph of your window showing the track and sash to Slide Master Hardware. Our team will measure the photo and confirm the exact specifications you need.
Conclusion
Choosing and installing the right sliding window lock is one of the simplest, most cost-effective security improvements you can make to your Australian home. Whether you’re securing ground-floor windows, protecting young children, or adding an extra layer of protection to vulnerable entry points, the right lock makes a measurable difference.
At Slide Master Hardware, we help Australian customers find the exact locks they need for their specific windows. Our team can identify your window type and track specifications from a photograph, recommend compatible locks, and ensure you receive the right components. With same-day dispatch for in-stock orders and Australia-wide shipping, we make the process straightforward. Get in touch with Slide Master Hardware today; we’ll help you secure your home with confidence.
Frequently Asked Questions
What is the best type of sliding window lock for home security?
Keyed locks offer superior security compared to thumbscrew options, as they require a key to open and cannot be easily manipulated from outside. For maximum protection, choose tamper-resistant models with reinforced strike sets. Consider combining a standard sliding window lock with a security bar for enhanced defence against forced entry, particularly on ground-floor windows.
How do you install a sliding window lock correctly?
Measure your window track width precisely, then position the lock on the sash frame where it aligns with the strike set on the opposite frame. Mark screw holes, drill pilot holes to prevent splitting, and secure with hex screws or thumbscrews. Ensure the locking mechanism engages smoothly without forcing. Test operation through multiple open-close cycles before declaring installation complete.
Can child safety window locks prevent accidental falls?
Yes, child safety locks with adjustable stoppers limit how far a window can open whilst maintaining ventilation. These locks restrict sash movement to a safe gap, typically 10-15 centimetres, preventing children from opening windows fully. Combine stoppers with keyed locks to ensure children cannot override the safety setting, providing comprehensive protection for young families.
What should I do if my sliding window lock won't engage properly?
Check the window track rail for dirt, debris, or damage that prevents proper sash alignment. Clean the track thoroughly and ensure both frames are square. If the latch still won't catch, the strike set may need adjustment, loosen mounting hardware and reposition slightly. For severely damaged tracks or bent sash frames, replacement parts may be necessary; contact a hardware specialist for assessment and sourcing correct components.
This article was written using GrandRanker