
Table of Contents
- Understanding Bradnams Sliding Door Rollers
- Visual Identification Guide for Bradnams Rollers
- How to Adjust Sliding Door Rollers
- Sliding Door Roller Replacement Steps
- Sliding Door Maintenance Tips and Lubrication
- Sliding Door Track Repair and Alignment
- Common Mistakes to Avoid When Replacing Rollers
- Conclusion
Bradnams Sliding Door Roller: Identification & Replacement Guide
Last Updated: July 13, 2026
When your sliding doors start sticking or grinding, the culprit is usually a worn-out roller assembly. At Slide Master Hardware, we’ve helped thousands of Perth homeowners identify and replace their bradnams sliding door roller components without ordering the wrong part. This guide walks you through visual identification, compatibility matching, adjustment techniques, and step-by-step replacement.
Understanding Bradnams Sliding Door Rollers
A Bradnams sliding door roller is the wheeled carriage that sits inside your door’s bottom track, allowing the panel to glide smoothly. The assembly consists of a plastic carriage housing, a nylon-grooved wheel, and a brass pin axle that holds it together.
Bradnams has manufactured doors across Australia for decades, with roller designs evolving over time. Older models use a simpler plastic carriage with a fixed-height nylon roller. Newer adjustable versions feature a spring-loaded mechanism for fine-tuning door height without removal. Understanding which type you have determines whether you can adjust on-site or need full replacement.
The nylon roller wears faster than the carriage by design, replacing a worn roller is cheaper than replacing the entire door. When your door starts dragging or requires excessive force to open, the roller is usually the first component to inspect.
Before ordering any replacement, photograph the existing assembly from multiple angles and note any visible part numbers. Slide Master Hardware offers free identification via email within 24 hours, eliminating the risk of ordering incompatible components.
Material Composition and Design
The plastic carriage is a reinforced polymer blend designed to withstand repeated compression against the track. It degrades under UV exposure and temperature extremes, common in Australian climates. The nylon roller is a grooved wheel, usually 25-30mm in diameter depending on the series. The grooves prevent sideways sliding that causes binding. When a roller shows flat or cracked areas, that’s wear from the track edge grinding against it.
The brass pin is critical and often overlooked. It’s brass specifically because it resists corrosion and won’t rust if exposed to moisture. A corroded or bent brass pin will cause sticking even if the nylon wheel looks fine. Always inspect and replace the pin if damaged.
Common Bradnams Door Series
The most common models in Perth homes are the Airlie series (1990s-2000s), the SD2 series (mid-2000s onwards), and the Signature range (modern variants). Each uses different roller dimensions and carriage designs, so compatibility varies significantly. Rollers from one series won’t fit another, an Airlie roller won’t work in an SD2 track.
Do not assume all Bradnams rollers are interchangeable. Ordering a roller for the wrong series results in a non-fitting part and potential track damage if forced. Always verify your exact series before purchasing.
Visual Identification Guide for Bradnams Rollers
Open your sliding door fully and look at the bottom edge where the door meets the track. You’ll see a rectangular plastic carriage sitting in the aluminium track, this is your roller assembly.
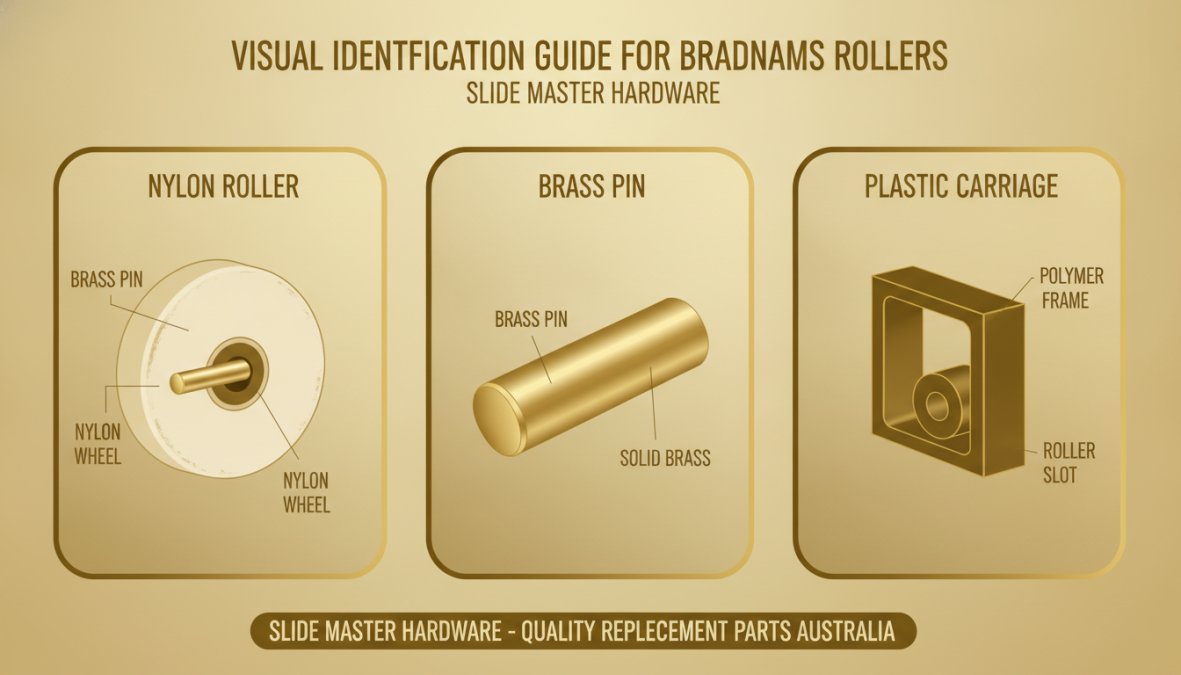
Examine the carriage shape. Fixed-height models have a simple rectangular profile with no visible adjustment mechanism. Adjustable models have a small screw hole or slot visible on the side or top. Look at the nylon wheel itself. A smooth wheel in good condition appears shiny and round. A worn wheel looks dull, may have flat areas where it’s been ground by the track, or shows cracks.
Check the track condition simultaneously. Run your finger along the inside of the aluminium track (carefully, edges are sharp). Rough patches, corrosion, or raised burrs indicate track damage requiring cleaning or repair before a new roller will work properly.
Part Number Recognition
Every Bradnams roller has a part number stamped on the plastic carriage. Common codes include GM-5141, GM-5142, GM-1219, and GM-1206. These tell you the exact roller type, diameter, and carriage design. The GM-5141 and GM-5142 are older fixed-height plastic carriage models. The GM-1219 is an adjustable polymer carriage allowing height fine-tuning. The GM-1206 is a spring-loaded adjustable model providing automatic height compensation.
If you can’t find a visible part number, measure the roller diameter and carriage dimensions. Photograph the assembly from all angles and send details to Slide Master Hardware via email for identification within 24 hours.
Part number identification is the most reliable way to order the correct replacement. If you can’t find the number stamped on your carriage, a clear photo sent to Slide Master Hardware eliminates guesswork.
Compatibility Matrix for Airlie and SD2 Series
| Door Series | Compatible Roller Models | Carriage Type | Adjustable | Track Width |
|---|---|---|---|---|
| Airlie (1990s-2000s) | GM-5141, GM-5142 | Fixed plastic | No | 19-22mm |
| SD2 (2005+) | GM-1219, GM-1206 | Adjustable polymer | Yes | 20-24mm |
| Signature (2015+) | GM-1219, GM-1206 | Adjustable polymer | Yes | 20-24mm |
| Older Bradnams | GM-5142 | Fixed plastic | No | 18-20mm |
Mixing series causes the carriage to sit too high or too low in the track, preventing smooth operation. Measure your track width at three points, if measurements vary, use the narrowest reading to ensure the roller fits everywhere.
How to Adjust Sliding Door Rollers
Before replacing a roller, try adjustment first. Many sticking doors can be fixed by raising the carriage height slightly, which relieves pressure on a worn wheel and extends its life.
Locate the adjustment screw on your carriage, usually a small Phillips or flathead screw on the side or top of the plastic housing. If you can’t see it, your roller is fixed-height and adjustment isn’t possible. Turn the adjustment screw clockwise to raise the door, counterclockwise to lower it. Make quarter-turn adjustments and test the door after each change. The goal is smooth, effortless gliding with no dragging.
Adjust height only when the door is fully open and resting in the track. Never adjust while partially open, as this can cause binding. Make small adjustments, a quarter turn often makes a noticeable difference.
Height Adjustment Techniques
The most common scenario is a door that drags at the bottom. This happens when the carriage settles over time due to track wear or roller flattening. Raising the carriage by one or two quarter-turns often restores smooth operation. Open the door fully and position yourself to see the adjustment screw clearly. Use a screwdriver that fits snugly. Turn slowly and deliberately. After each quarter turn, close the door and test it. If adjustment doesn’t improve operation after four or five quarter turns, stop. The door may be hitting the frame at the top, or the track itself may be damaged.
Tool Checklist for Adjustments
Adjusting a Bradnams sliding door roller requires minimal tools: Phillips or flathead screwdriver, callipers or ruler to measure roller diameter (optional), clean cloth or small brush to remove debris, and silicone spray or PTFE-based dry lubricant (optional but recommended). The adjustment process takes five minutes once you locate the screw.
Sliding Door Roller Replacement Steps
If adjustment doesn’t work or your roller is visibly damaged, replacement is the next step. The process takes 30-45 minutes for most homeowners.
Removing the Old Roller Assembly
Open the door fully. Locate the two adjustment screws at the bottom of the door frame, one near each end. Turn both counterclockwise to lower the door onto a protective surface like a towel or cardboard. Grasp the door frame firmly and lift it straight up. The door will separate from the track. Place it on a flat surface with protective padding underneath.
Locate the roller assembly at the bottom of the door. Some models have a retaining clip or bracket. If present, remove it first using a flathead screwdriver or pliers. Grasp the carriage and slide it out horizontally. It should slide without resistance. If stuck, check for remaining clips or fasteners.
Do not force the carriage out. If it resists, you’ve missed a retaining clip. Forcing it can crack the door frame or damage the new carriage. Take time to locate any clips before pulling.
Installing Your New Carriage and Nylon Roller
Clean the cavity where the carriage sits. Remove any dirt, rust, or debris. Wipe interior surfaces with a clean cloth to ensure smooth operation. Position the new carriage at the opening and slide it in horizontally with the nylon roller facing downward into the track. Slide slowly and ensure it seats fully, sitting flush with the door frame edge.
If your new carriage includes a retaining clip, install it now. Ensure the clip is secure and doesn’t interfere with roller movement. Lift the door carefully and position it back into the track. Align the roller with the track opening and lower the door gently. The carriage should slide into the track smoothly. Once in the track, turn the adjustment screws clockwise to raise the door slightly. The door should rest on the roller without excessive force. Test the door’s movement, it should glide smoothly from fully open to fully closed without dragging or grinding.
Sliding Door Maintenance Tips and Lubrication
Proper maintenance extends roller life dramatically. Most roller failures result from track contamination and lack of lubrication, not manufacturing defects. A maintenance routine takes 15 minutes every three months.
Track Cleaning and Wear Prevention
Dirt, sand, and debris accumulate in the aluminium channel, grinding against the roller and causing premature wear. Vacuum the track thoroughly using a narrow attachment. Remove all visible debris and use a damp cloth to wipe inside surfaces. For heavily soiled tracks, use a soft-bristled brush and mild detergent solution. Avoid abrasive cleaners or wire brushes, which scratch the aluminium.
Pay special attention to corners and crevices where the track meets the door frame. After cleaning, inspect the track surface. Run your finger along the inside carefully. If you feel rough patches, corrosion, or raised burrs, the track is damaged. Light surface corrosion can be smoothed with fine-grit sandpaper (400-600 grit).
Track cleaning should happen quarterly in Perth’s dusty climate. A clean track means your new roller will last significantly longer.
Lubrication Best Practices
Use a silicone-based dry lubricant or PTFE spray. Avoid WD-40 or oil-based lubricants, which collect dust and gum up over time. Apply lubricant sparingly to the roller and along track edges. A light coating is sufficient; excess attracts dirt. Lubricate after cleaning to coat clean surfaces without mixing with dirt. Lubricate every three months in normal conditions, monthly with heavy use.
Sliding Door Track Repair and Alignment
Track damage is the second most common cause of sliding door problems after roller wear. A bent or corroded track will destroy a new roller within weeks if not repaired first.
Identifying Track Damage
Inspect your track carefully before installing a new roller. Look for dents or bends (the track should be perfectly straight), corrosion or rust (rough, pitted surfaces indicate damage), raised burrs or sharp edges, and gaps or separation (the track should be firmly attached). Use a straightedge or level to check track alignment. A properly aligned track should have no gaps between the straightedge and the track surface.
Door Alignment Troubleshooting
Check vertical alignment first. The door should hang straight without tilting. If the top leans away from the frame, the door is out of plumb and needs adjustment at the top pivot or hinge. Check horizontal alignment next. Open the door fully and look at the gap between the door edge and frame. The gap should be uniform from top to bottom.
For sliding doors, horizontal alignment is controlled by roller height adjustment screws. Raising one side slightly can correct minor tilting. If significantly misaligned, the track itself may be bent and require professional repair.
Alignment issues often feel like roller problems but are actually track problems. Before replacing a roller, always check track alignment. Replacing a roller on a misaligned track is wasted money.
Common Mistakes to Avoid When Replacing Rollers
Ordering the wrong part number: Always verify the part number before ordering. Guessing results in a non-fitting roller and wasted money.
Ignoring track damage: A new roller installed in a damaged track will wear out within weeks. Inspect and repair the track before installation.
Over-tightening adjustment screws: Forcing them past their travel range can strip threads or crack the carriage housing. Make small adjustments and stop when resistance increases.
Forcing the carriage out: If it resists, look for retaining clips you’ve missed. Forcing it damages the door frame and makes new carriage installation difficult.
Skipping lubrication: A new roller without lubrication wears faster than the old one. Lubricate immediately after installation and maintain a regular schedule.
Mixing roller types: Don’t install a fixed-height roller in a door designed for adjustable rollers. The carriage won’t seat properly and the door will bind.
Not cleaning the track after removal: Debris left in the track contaminates the new roller immediately. Clean thoroughly before installation.
Adjusting height while the door is partially open: This can cause the carriage to bind. Always adjust with the door fully open and resting in the track.
Identifying and replacing a bradnams sliding door roller doesn’t require professional help if you follow these steps carefully. Start with visual identification and part number verification to eliminate ordering errors. Check your track condition before installation. Lubricate regularly and clean your track quarterly to extend roller life.
If you’re uncertain about your part number or track condition, Slide Master Hardware offers free identification via email with same-day dispatch for in-stock parts ordered before 1pm AWST. The team can confirm compatibility for Airlie, SD2, and Signature series doors, ensuring you receive the exact roller your door needs.
Frequently Asked Questions
How do I know which Bradnams sliding door roller I need?
Identify your roller by checking the part number on the existing carriage housing or taking a clear photo of the roller assembly to submit to Slide Master Hardware. Common Bradnams models include the GM-5142 (older style plastic carriage with nylon roller and brass pin) and GM-1219 (adjustable polymer carriage). The compatibility matrix on our site helps match your door series, whether Airlie, SD2, or Signature, to the correct replacement part.
Can I replace Bradnams sliding door rollers myself?
Yes, DIY replacement is achievable with basic tools. You'll need a screwdriver, adjustable spanner, and possibly a small hammer. The process involves removing the sliding panel, unbolting the old roller assembly from the carriage housing, and installing the new nylon roller and brass pin. Most homeowners complete the task in 30-45 minutes. If you're unsure, Slide Master Hardware offers expert identification via photo to ensure you order the exact part before you begin.
What are the signs that my Bradnams sliding door rollers are worn out?
Worn rollers show several telltale signs: the sliding panel drags or binds in the track, you hear grinding or squeaking noises, the door won't stay open or closed properly, or the wheel diameter has visibly flattened. Track wear patterns and misalignment often follow roller deterioration. Regular maintenance, cleaning the track and lubricating the roller assembly, can extend the life of your nylon roller and brass pin components significantly.
How often should I clean and lubricate my Bradnams sliding door rollers?
Clean your sliding door track and roller assembly every 3-6 months, or more frequently in dusty environments. Remove debris from the track using a damp cloth and vacuum cleaner, then apply a light silicone-based lubricant to the nylon roller and axle. Avoid heavy grease, which attracts dirt. Proper lubrication best practices prevent track wear, reduce friction on the carriage, and keep your Bradnams door operating smoothly for years.
This article was written using GrandRanker